Thursday, October 7, 2010

Omelet for two... but actually it can feed 4!


Hey friends! I am so sorry I've been gone so long! Life and its own challenges sometimes make me take a break on my blog without even planning on it!

The last weekend my husband's family came to visit us. The weather is getting cooler and cooler, so I wanted to make them a comforting breakfast. This is how I came up with this recipe from one of my favorite chefs... Ina Garten.

The original recipe says that is an omelet for two. I guess we were a little bit more conservative on our portions and this whole thing fed 4 adults and two little ones. Though we serve it with a side of fresh fruit. So, I guess if you serve it on its own, it can totally warm up the heart (and appetite) of two!


Ingredients:

1/4 pound good thick-cut bacon
1 tablespoon unsalted butter
1 cup medium-diced Yukon gold potato
1/2 cup chopped yellow onion
1 tablespoon minced jalapeno pepper
5 extra-large eggs
1 tablespoons milk or cream
1 teaspoon kosher salt
1/2 teaspoon freshly ground black pepper
1/4 cup chopped scallions, white and green parts
4 ounces extra-sharp Cheddar, diced, plus extra grated cheese, for garnish


Directions:

Preheat the oven to 350 degrees F.

Cut the bacon crosswise in 1-inch slices. Cook the bacon in an 8-inch ovenproof saute pan over medium-low heat for 5 to 7 minutes, stirring occasionally, until browned. Drain the bacon on paper towels and discard the fat from the pan. Add the butter to the pan, and then add the potato and yellow onion. Cook over medium-low heat for about 10 minutes, tossing occasionally, until the onion starts to brown and the potato is tender but firm. Add the jalapeno pepper and cook for 30 seconds.

Meanwhile, in a medium bowl, beat the eggs, milk, salt, and pepper together with a fork. Stir in the scallions and diced Cheddar. When the potato is cooked, add the bacon to the pan and pour over the egg mixture. Place the pan in the oven for 15 to 20 minutes, until the omelet puffs and the eggs are almost cooked in the center. Sprinkle with a handful of grated Cheddar and bake for another minute. Serve hot directly from the pan.


Source: Recipe courtesy of "Barefoot Contessa at Home", by Ina Garten


Monday, September 13, 2010

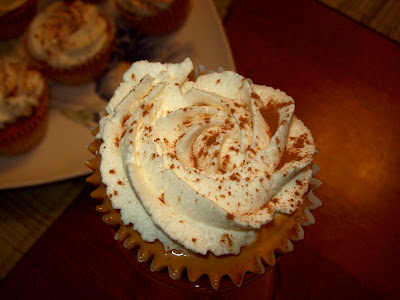
Tres Leches Cupcakes


This is a delicious and simply recipe to wow your crowds!


Ingredients:

6 large eggs, separated, room temperature
1/4 teaspoon baking soda
1/4 teaspoon coarse salt
1 cup sugar
1/2 cup (1 stick) unsalted butter, melted and cooled
1 cup all-purpose flour, sifted
1 can (12 ounces) evaporated milk
1 can (14 ounces) sweetened condensed milk (1 1/2 cups)
3/4 cup heavy cream
2 cups heavy cream
1/4 cup confectioner's sugar sifted
Ground cinnamon, for dusting


Directions:

1. Preheat oven to 325ºF. Line standard muffin tins with paper-lined foil liners. With an electric mixer on medium speed, whisk together egg whites, baking soda, and salt until soft peaks form. Reduce speed to low. Add yolks and sugar; whisk until completely combined. Fold in melted butter with a flexible spatula. Add flour in four batches, folding until just combined after each.

2. Divide batter evenly among lined cups, filling each halfway. Bake, rotating tins halfway through, until light golden brown, about 25 minutes. Remove from oven. Immediately poke holes in tops of cupcakes with a skewer.

3. Whisk together evaporated milk, condensed milk, and heavy cream. With cupcakes still in tins, brush milk mixture over cupcakes, repeating until all liquid has been used. Allow cupcakes to absorb mixture, at least 30 minutes (or up to 1 day in the refrigerator, wrapped tightly in plastic once completely cool; bring to room temperature before serving).

4. Whisk heavy cream until soft peaks form. Add confectioner's sugar, and whisk until combined. If not using immediately, whipped cream can be refrigerated, covered tightly, up to 3 hours in an airtight container.

5. To finish, dollop whipped cream generously onto cupcakes, and dust with ground cinnamon. Serve immediately.


Source: Martha Stewart's Cupcakes

Wednesday, September 1, 2010

How to freeze corn

This summer I've been very interested in freezer fresh organic fruits and vegetables for our winter use. After checking several websites, I decided that this approach gets the best flavor of our produces after they are frozen. If you want to freeze some corn, here are some tips that may help you to do it!


Ingredients and Equipment Needed:

6 fresh corn on the cob
1 Large pot of boiling water
1 Large pot of iced water
Vacuum food sealer, 1 quart plastic containers for frozen food or "Ziploc" type freezer bags
1 sharp knife
1 set of tongs

Directions:

1. Husk the corn and pick off as much of the silk as you can. A soft vegetable brush is the fastest and easiest way to get the remaining silk off - just don't be too rough with it.

2. Get the pot filled ¾ full with hot water, put it on your largest burner (or straddle two burners) and get it heating to a full rolling boil. Next, get the other pot or big bowl filled with ice and cold water. You may need to buy a bag or two of ice if you are planning to do more than a dozen ears of corn.

3. Begin counting the blanching time as soon as you place the corn in the boiling water. Cover the kettle and boil at a high temperature for 4 minutes. You may use the same blanching water several times (up to 5). Be sure to add more hot water from the tap from time to time to keep the water level at the required height.

Blanching time varies depending on the type of frozen corn you are making: cut-whole kernel,cream style or corn-on-the-cob: between 4 to 6 minutes.


4. After vegetables are blanched, cool them quickly to prevent overcooking. Plunge the corn into a large quantity of ice-cold water (I keep adding more ice to it). A good rule of thumb: Cool for the same amount of time as the blanch step. For
instance, if you blanch sweet corn for 4 minutes, then cool in ice water for 4 minutes.


5. Cut kernels from cob about 2/3 the depth of the kernels. I hold the ear by the
small end, and slide the knife down the ear.


6. Bag the corn. You can use a vacuum food sealer to prevent freeze burn. Otherwise, make sure you get all the air out of your bags or plastic containers. Label your packages and freeze immediately.

Thursday, August 19, 2010

Strawberry Cheesecake


I made this delicious cheesecake for my niece. She got baptized and requested a strawberry cheesecake as dessert. I checked several recipes and ended up with this amazing one. Strawberries + chocolate = always a great combo!


Ingredients:

- For the strawberry puree:
10 oz. frozen organic strawberries, thawed
2 tbsp. sugar
2 tsp. freshly squeezed lemon juice

- For the graham cracker crust:

2 cups graham crackers crumbs
3 tbsp. sugar
¼ tsp. salt
4 tbsp. unsalted butter, at room temperature

- For the cheesecake filling:
16 oz. cream cheese, at room temperature
1 cup sugar
3 large eggs, at room temperature
1½ tsp. vanilla extract
¼ tsp. salt
12 oz. sour cream, at room temperature
2/3 cup strawberry puree

- For the ganache:
4 oz. bittersweet chocolate, finely chopped
4½ oz. heavy cream
½ of 1 large egg, beaten


Directions:

To prepare the strawberry puree, set the thawed strawberries in a fine strainer set over a bowl to collect the excess juices. Press down on the berries to extract as much juice as possible. You should have about 4-6 oz. of juice. Transfer the juice to a small sauce pan over medium-high heat and simmer to reduce to about 2 oz. Mix in the sugar and stir to dissolve. Blend in the lemon juice and the reserved solids. Transfer the mixture to a blender or food processor and puree until smooth.

*(To use fresh strawberries, hull and slice the berries. Toss the berries with the 2 tablespoons of sugar and set in the strainer placed over a bowl. Let sit for 1-2 hours to extract the juices. Press down on the berries to extract as much juice as possible. Transfer the juice to a small sauce pan over medium-high heat and simmer to reduce to about 2 oz. Blend in the lemon juice and the reserved solids. Transfer the mixture to a blender or food processor and puree until smooth.)

To prepare the crust, preheat the oven to 400˚F. Place the cracker crumbs, sugar and salt in the bowl of a food processor. Pulse until the everything is well mixed. Add in the butter and pulse until the mixture is evenly combined. Transfer the mixture to a 9-inch springform pan and press into a uniform layer over the bottom and 2 inches up the sides of the pan. Bake for 15 minutes, or until deep golden brown. Set aside to cool.

Reduce the oven temperature to 350˚ F.

To make the cheesecake filling, combine the cream cheese and sugar in the bowl of a stand mixer fitted with the whisk attachment. Beat on medium-high speed for 3 minutes, until smooth. Beat in the eggs one at a time, mixing well after each addition and scraping down the sides of the bowl
as needed. Blend in the vanilla and salt. Mix in the sour cream until well incorporated. Blend in the strawberry puree.

Wrap the outside of the springform pan tightly in a double layer of aluminum foil. Pour the batter into the crust.

Place the springform in a larger pan with a water bath. Bake for 55 minutes. Remove the cheesecake from the oven but maintain the oven temperature.

To make the ganache, place the chocolate in a small bowl. Bring the cream to a boil in a small saucepan. Pour the hot cream over the chopped chocolate and let stand 1-2 minutes. Whisk until smooth. Whisk in the egg. Spread the ganache mixture over the still hot cheesecake, being careful not to pour it all in one place (the cheesecake is still delicate). Smooth the top with an offset spatula if necessary. Bake 12-15 minutes, until the ganache is set around the edges.

Remove from the oven and transfer to a wire cooling rack. Cover with a large bowl inverted over the top to help cool slowly. When it comes to room temperature, transfer to the refrigerator. Chill at least 8 hours before unmolding from the springform (and be sure the ganache is completely set before covering with plastic wrap).

Transfer to a serving platter. Slice with a thin knife run under hot water and wiped dry between slices. Serve.


Source: Adapted from Recipe Courtesy of "Annie's Eats"

Thursday, August 12, 2010

Banana Caramel with Vanilla Swiss Meringue Buttercream Cupcakes


This is a delicious way to use your ripped bananas. The vanilla Swiss Meringue Buttercream is absolutely out of this world!


Ingredients:

- For the Cupcakes:
3 cups sifted cake flour
1 1/2 tspn. baking soda
3/4 tspn. baking powder
3/4 tspn. salt
1 tspn. ground cinnamon
6 ounces (1 1/2 stick) unsalted butter, softened
1 1/2 cups packed light-brown sugar
3 large eggs
4 very ripe large bananas, mashed (about 2 cups), plus sliced bananas for garnish
3/4 cup buttermilk
1/2 tspn. pure vanilla extract
1 cup chopped pecans

- For the Swiss Vanilla Meringue Buttercream
12 ounces (3 sticks) unsalted butter, softened
4 large egg whites, room temperature
1 tspn. pure vanilla extract

- For the caramel
1 cup plus 2 Tbspn. sugar
1/4 cup water
1/4 cup heavy cream
1 Tbspn. light corn syrup


Directions:


To prepare the cupcakes. Preheat oven to 350ºF. Line standard muffin tins with paper liners. Whisk dry ingredients in a large bowl. In the meantime, cream the butter and sugar with a mixer until light and fluffy. Add the eggs, one at a time, beating after each addition.

Reduce speed to low. Mix the bananas, buttermilk and vanilla (as wet ingredients) in a measuring cup. Add dry ingredients to butter mixture in 3 additions, alternating with wet ingredients and ending with dry. Scrape sides of bowl. Stir pecans into batter. Divide batter among muffin cups, filling each 2/3 full.

Bake cupcakes until testers inserted into centers come out clean, about 20 minutes. Let cool in tins for five minutes, then transfer to wire racks.

To prepare the caramel. Bring 1/2 cup plus 2 tablespoons of sugar, the corn syrup and water to a boil in a medium saucepan. Wash sides of pan with a wet pastry brush to prevent sugar crystals from forming. Cook, undisturbed, until caramel is dark amber. remove from heat, and slowly add cream, stirring with a wooden spoon until smooth. Let cool.

To prepare the frosting. Place egg whites and remaining 1/2 cup of sugar in a heatproof mixer bowl set over a pot of simmering water. Whisk until sugar dissolves and mixture registers 160ºF on a candy thermometer.

Remove from heat, and attach bowl to a mixer. Whisk on medium speed for 5 minutes. Increase speed to medium-high, and whisk until stiff, glossy peaks form, about 6 minutes. Reduce speed to medium, and add butter, 2 tablespoons at a time, whisking well after each addition. Whisk in vanilla. Switch to paddle attachment, and beat until smooth, 3 to 5 minutes.

Assembling the cupcakes. Pipe the icing over the cupcakes and drizzle them with the caramel (I put mine inside of a squeezing bottle). Top with sliced bananas as garnish.

Enjoy!


Source: Recipe Adapted from "Marta Stewart's website".

Friday, August 6, 2010

Baked Ziti


There are so many comforting dishes that involve pasta, but certainly none of them like this one! I suggest you to try this recipe. It is easy, fast and DELICIOUS!!!!!


Ingredients:

1 lb. whole milk or 1% cottage cheese
2 large eggs, lightly beaten
3 oz. grated Parmesan cheese (about 1 1/2 cups), divided
Table salt
1 lb. ziti
1 tbsp. extra-virgin olive oil
20 oz. turkey Italian sausage
1/2 cup yellow onion, finely chopped
5 medium cloves garlic, minced or pressed
1 (28 oz.) can tomato sauce
1 (14.5 oz) can diced tomatoes
1 tsp. dried oregano
1/2 cup plus 2 tbsp. chopped fresh basil leaves, divided
1 tsp. sugar
Ground black pepper
3/4 tsp. cornstarch
1 cup heavy cream (or whole milk)
8 oz. low-moisture mozzarella, cut into 1/4-inch pieces


Directions:

Center a rack in the oven and preheat the oven to 350° F. Whisk cottage cheese, eggs, and 1 cup Parmesan together in a medium bowl; set aside. Bring a large pot of water to boil. Stir in 1 tablespoon salt and the pasta; cook until pasta begins to soften but is not yet cooked through, 5-7 minutes. Drain the pasta and leave in colander.

Meanwhile, heat olive oil in a skillet over medium heat. Crumble in the turkey sausage and cook until nearly browned. Add in the onion and garlic and continue to cook until the onion is softened and the sausage is completely browned. Stir in the tomato sauce, diced tomatoes and oregano; simmer until thickened, about 10 minutes. Off the heat, stir in 1/2 cup basil and the sugar, and season with salt and pepper.

In a small bowl stir together the cornstarch and heavy cream. Transfer the mixture to the now-empty stockpot over medium heat. Bring to a simmer and cook until thickened, 3-4 minutes. Remove the pot from the heat and add the cottage cheese mixture, 1 1/2 cups of the tomato sauce and 3/4 cup mozzarella. Stir to combine. Add the pasta and toss to coat thoroughly with the sauce.

Transfer the pasta to a 9×13″ baking dish and spread the remaining tomato sauce evenly over the top. Sprinkle the remaining mozzarella and Parmesan over the top. Cover the baking dish tightly with foil and bake for 30 minutes.

Remove the foil from the pan and continue to cook until the cheese is bubbling and beginning to brown, about 30 minutes longer. Cool for 20 minutes. Sprinkle with the remaining 2 tablespoons basil and serve.

Source: Recipe Courtesy of "Annie's Eats"

Wednesday, August 4, 2010

Vanilla Cake, Lemon Curd filling and Vanilla Buttercream Frosting = Delicious!


I was asked to make dessert for a friend's anniversary last week, and I made this cake. It is simply delicious, even better the next day...


Ingredients:

- For the Cake


2 1/4 cups cake flour
1 tablespoon baking powder
1/2 teaspoon salt
1 1/4 cups whole milk or buttermilk
4 large egg whites
1 1/2 cups sugar
2 teaspoons grated lemon zest
1 stick (8 tablespoons) unsalted butter, at room temperature
1/2 teaspoon pure lemon extract
(I made a three layers cake, so I did a recipe and a half)


- For the Filling:

8 egg yolks
1 1/2 cups sugar
1/4 cup (1/2 stick) butter
3 lemons, zest grated and juiced


- For the Vanilla Buttercream Frosting:

6 large egg yolks
3/4 cup sugar
1/2 cup light corn syrup
2 1/2 teaspoons vanilla extract
1/4 teaspoon salt
4 sticks unsalted butter, cut into chunks and softened
(Makes about 4 cups)


Directions:

Getting ready: Center a rack in the oven to 350 degrees F. Butter two (or 3, if you're making a 3 layers cake) 9-x-2-inch round cake pans and line the bottom of each pan with a round of buttered parchment or wax paper. Put the pans on a baking sheet.

To Make The Cake: Sift together the flour, baking powder and salt.

Whisk together the milk and egg whites in a medium bowl.

Put the sugar and lemon zest in a mixer bowl or another large bowl and rub them together with your fingers until the sugar is moist and fragrant. Add the butter and, working with the paddle or whisk attachment, or with a hand mixer, beat at medium speed for a full 3 minutes, until the butter and sugar are very light. Beat in the extract, then add one third of the flour mixture, still beating on medium speed. Beat in half of the milk-egg mixture, then beat in half of the remaining dry ingredients until incorporated. Add the rest of the milk and eggs, beating until the batter is homogeneous, then add the last of the dry ingredients. Finally, give the batter a good 2-minute beating to ensure that it is thoroughly mixed and well aerated. Divide the batter between the two pans and smooth the tops with a rubber spatula.

Bake for 30 to 35 minutes, or until the cakes are well risen and springy to the tough – a thin knife inserted into the centers should come out clean. Transfer the cakes to cooling racks and cool for about 5 minutes, then run a knife around the sides of the cakes, unmold them and peel off the paper liners. Invert and cool to room temperature right side up. (The cooled cake layers can be wrapped airtight and stored at room temperature overnight or frozen for up to 2 months.)

To make the Lemon Curd Filling: Place the ingredients in the double boiler over boiling water. Don't let top pan touch the water. Cook and stir until mixture begins to gel or thicken, this process will take quite some time. Hang in there. It is totally worth it. Once the consistency is thick, remove from heat and allow to cool (It will thicken even more once cooled).


To make the Vanilla Buttercream Frosting: Whip the egg yolks in a large bowl with an electric mixer on medium speed until slightly thickened and pale yellow, 4 to 6 minutes.

Meanwhile, bring the sugar and corn syrup to a boil in a small saucepan over medium heat, stirring occasionally to dissolve the sugar, about 3 minutes.

Without letting the hot sugar mixture cool off, turn the mixer to low and slowly pour the warm sugar syrup into the whipped egg yolks without hitting the side of the bowl or the beaters. Increase the mixer speed to medium-high and whip the mixture until it is light and fluffy and the bowl is no longer warm, 5 to 10 minutes.

Reduce the mixer speed to medium-low and add the vanilla and salt. Gradually add the butter, one piece at a time, until completely incorporated, about 2 minutes. Increase the mixer speed to medium-high and whip the buttercream until smooth and silky, about 2 minutes. (If the mixture looks curdled, wrap a hot, wet towel around the bowl and continue to whip until smooth, 1 to 2 minutes).

Assembling and Decorating the cake: Start by adding like a tablespoon of your frosting on the center of your cake plate. This will prevent your cake of moving while you're working on it.

Place the first layer, cut side down, on the cake plate. (Moist the cake with simple syrup if desired). Pour half of the lemon curd filling and spread it evenly leaving about 3/4 of an inch from the edges. Then, place the next layer on top, cut side down. (Moist with simple syrup if desired). Add and spread the rest of the lemon curd filling. Top with the third layer. At this point, you can smooth the sides if any filling is coming out. If you have a brush, it would help to get rid off any crumbs that you see around the sides or top of the cake.

Spread a thin layer of the frosting all over the cake. I personally start doing the top and then going down the sides. It does not have to be perfect, it is a very thin spread in order to avoid crumbs to the final coat. Once you are done with this part, chill the cake until you touch the frosting on top and leaves a little mark.

Once the cake is ready, give the final coat of frosting and decorate as desired.


Sources:
- Perfect Party Cake - Recipe Courtesy of Dorie Greenspan.
- Lemon Curd Filling - Recipe Courtesy of Paula Deen.
- Vanilla Buttercream Frosting - Recipe Courtesy of The America's Test Kitchen Family Baking Book.

Thursday, July 29, 2010

Cookies and Cream Cupcakes


Following my cupcakes summer fun, here I share with you ones that you will love! Not only because they are fun to make but also because they are delicious! Seriously, who doesn't enjoy cookies and cream flavor with an oreo on top?!?! Hope you try it, you won't regret it!


Ingredients:

- For the cupcakes:
24 Oreo halves, with cream filling attached
2¼ cups all-purpose flour
1 tsp. baking powder
½ tsp. salt
8 tbsp. unsalted butter, at room temperature
1 2/3 cup sugar
3 large egg whites, at room temperature
2 tsp. vanilla extract
1 cup milk
20 Oreo cookies, coarsely chopped (I quarter them)

- For the frosting:
8 oz. cream cheese, at room temperature
6 tbsp. unsalted butter, at room temperature
1 tbsp. vanilla extract
4 cups confectioners' sugar, sifted
2 tbsp. heavy cream

- For garnish:
Oreo cookie crumbs
24 Oreo cookie halves


Directions:

Preheat the oven to 350˚ F. Line the wells of two cupcake pans with 24 paper liners. Place an Oreo halve in the bottom of each liner, cream side up. In a medium bowl, combine the flour, baking powder and salt; stir together with a fork to blend and set aside. In the bowl of an electric mixer, combine the butter and sugar and beat together on medium-high speed until light and fluffy, about 2 minutes. Blend in the egg whites one at a time, beating well after each addition. Blend in the vanilla extract. With the mixer on low speed, beat in half of the dry ingredients just until incorporated. Add the milk and beat just until combined, then mix in the remaining dry ingredients. Gently fold in the chopped Oreos with a rubber spatula until evenly incorporated, being careful not to over-mix.

Evenly divide the batter between the prepared cupcake liners. Bake for 18-20 minutes, rotating the pans halfway through baking, until a toothpick inserted in the center comes out clean. Allow to cool in the pans 5-10 minutes, then transfer to a wire rack to cool completely.

To make the frosting, combine the cream cheese and butter in the bowl of an electric mixer and beat on medium-high speed until smooth, about 1 minute. Blend in the vanilla extract. Beat in the confectioners' sugar until incorporated and smooth, 1-2 minutes. Add the heavy cream to the bowl and beat on medium-low speed just until incorporated, then increase the speed to medium-high and whip for 4 minutes until light and fluffy, scraping down the sides of the bowl as needed.

Frost the cooled cupcakes as desired. Sprinkle with Oreo crumbs and garnish with Oreo halves.


Source: Recipe Courtesy of "Annie's Eats"

Wednesday, July 28, 2010

Chocolate Kahlua Cupcakes


Cupcakes have become an addiction to make! They are so much fun! A long time ago, I made these delicious ones for a friend. Hope you enjoy the richness and lovely coffee flavor of them!

Ingredients:

- For the cupcakes:
¾ cup unsweetened cocoa powder
1 tbsp. instant espresso powder
1½ cups all-purpose flour
1½ cups sugar
1½ tsp. baking soda
¾ tsp. baking powder
¾ tsp. salt
2 large eggs
¾ cup warm water
¾ cup buttermilk
3 tbsp. vegetable oil
1 tsp. vanilla extract


- For brushing the cupcakes:
Kahlua liqueur

- For the frosting:
12 tbsp. unsalted butter, at room temperature
4 cups confectioners' sugar, sifted
7-8 tbsp. Kahlua liqueur
2 tbsp. heavy cream


Directions:
To make the cupcakes, preheat the oven to 350˚ F. Line standard cupcake pans with paper liners. In a large mixing bowl combine the cocoa powder, espresso powder, flour, sugar, baking soda, baking powder and salt; whisk well to blend. Add the eggs, warm water, buttermilk, vegetable oil and vanilla extract to the bowl with the dry ingredients and mix on medium-high speed until smooth, 2-3 minutes, scraping down the sides of the bowl as needed.

Divide the batter evenly between the prepared cupcake liners, filling about 2/3 full. Bake until the tops spring back when pressed lightly, about 18-20 minutes, rotating the pans halfway through baking. Let cool in the pan 5-10 minutes, then transfer to a wire rack. Poke a few holes in the top of each cupcake with the tines of a fork and brush with Kahlua while still warm. Allow to cool completely.

To make the frosting, beat the butter in the bowl of an electric mixer until smooth and fluffy, about 2 minutes. Mix in the confectioners' sugar until incorporated. Add in the Kahlua and beat on medium speed until well blended. Add in the heavy cream and beat on medium-high speed for about 4 minutes, until light and fluffy. Frost cooled cupcakes as desired.


Source: Recipe Courtesy of "Annie's Eats"

Wednesday, July 21, 2010

Triple Chocolate Cupcakes


This beauties will blow your mind! They are out of this world!!!! I have a friend that just had her little baby and I was looking for a special treat for her and OF COURSE, I went to my favorite food blog "annie's eats" and after browsing all her cupcakes, many of them I have already made, but some how I was driven by this chocolate seduction... let me tell ya, I wasn't disappointed, actually I feel like I was rewarded!


Ingredients:
Yield: about 32 cupcakes


- For the cupcakes:
¾ cup unsweetened Dutch-process cocoa powder
¾ cup hot water
3 cups all-purpose flour
1 tsp. baking soda
1 tsp. baking powder
1¼ tsp. coarse salt
1½ cups (3 sticks) unsalted butter
2¼ cups sugar
4 large eggs, at room temperature
4 tsp. vanilla extract
1 cup sour cream, at room temperature

- For the ganache filling:
8 oz. bittersweet chocolate, finely chopped
1 cup plus 2 tbsp. heavy cream
4 tbsp. unsalted butter, cut into 4 pieces, at room temperature

- For the frosting:
14 oz. bittersweet chocolate, finely chopped
9 oz. cream cheese, at room temperature
9 tbsp. unsalted butter, at room temperature
3 cups confectioners' sugar, sifted
6 tbsp. unsweetened Dutch-process cocoa powder
Pinch of salt
1 cup plus 2 tbsp. sour cream

- For the chocolate curls:
Large block of high-quality semi- or bittersweet chocolate


Directions:

To make the cupcakes, preheat the oven to 350˚ F. Line standard cupcake pans with paper liners. In a small bowl, whisk together the cocoa powder and hot water until smooth. In a medium bowl, whisk together the flour, baking soda, baking powder, and salt; set aside.

In a medium saucepan, combine the butter and the sugar over medium heat. Heat, stirring occasionally to combine, until the butter is melted. Remove the mixture from the heat and transfer to the bowl of an electric mixer fitted with a paddle attachment. Beat on medium-low speed, 4-5 minutes, until the mixture is cooled. Mix in the eggs, one at a time, scraping down the sides of the bowl as needed and beating well after each addition. Mix in the vanilla and then the cocoa mixture and beat until incorporated. With the mixer on low speed add in the dry ingredients in two batches, alternating with the sour cream, beating just until combined.

Divide the batter between the prepared cupcake liners, filling them about ¾ of the way full. Bake 18-20 minutes or until a toothpick inserted in the center comes out clean, rotating the pans halfway through baking. Allow the cupcakes to cool in the pan 5-10 minutes, then transfer to a wire rack to cool completely.


To make the ganache, place the chopped chocolate in a medium bowl. Heat the cream in a small saucepan and bring to a boil. Once boiling, remove from the heat and pour over the chopped chocolate. Let stand about 1 minute. With a whisk, gently stir the chocolate and cream together in small circles. When the ganache has become smooth, whisk in the butter 1 piece at a time until incorporated. Transfer the bowl to the freezer or refrigerator to chill and thicken the ganache a bit. Whisk every 5-10 minutes to help it cool evenly. Once the mixture is slightly thickened and no longer runny, you are ready to fill the cupcakes.

To assemble the cupcakes, cut a cone out of the center of each cupcake with a small paring knife. Cut off the pointed end of the cone and discard (or eat) so you are left with a cap of cake to cover the filling. Drop a spoonful of ganache into the center of each cupcake and recover the hole with the cap.


To make the frosting, melt the chocolate in a heat-proof bowl set over a pot of simmering water. Set aside to cool until just barely warm. In the bowl of a stand mixer fitted with the paddle attachment, beat the cream cheese and butter on medium-high speed until pale and fluffy, about 3-4 minutes. Gradually mix in the confectioners' sugar, cocoa powder and salt. Beat in the melted and cooled chocolate and then the sour cream. Continue beating until the mixture is smooth and well blended. Frost cupcakes immediately.

To make the chocolate curls, warm the block of chocolate just slightly (heat in 5-second intervals in the microwave - be careful not to melt). Use a vegetable peeler to create chocolate curls. Top cupcakes with curls immediately. Reheat chocolate as needed to keep it workable.


As you can tell by the pictures, I wasn't able to conquer the curls, they most likely look like chocolate shavings. It takes a little practice and the right kind of chocolate to get those lovely curls!


Source: Recipe Courtesy of Annie's Eats.

Friday, July 16, 2010

Grilled Peaches, Homemade Vanilla Ice cream and Melted Chocolate


What a delicious summer dessert and so easy to make, especially when you have company!


Ingredients:

8 fresh peaches, pitted and halved
Vegetable oil
1 batch of Vanilla Ice Cream (homemade is even better!)
4 ounces bittersweet or semi sweet chocolate, melted
1/4 cup chopped walnuts, toasted and chopped


Directions:

Heat grill to high. Brush peaches with oil and grill, cut side down, until golden brown, about 2 minutes. Turn over and continue grilling for 2 minutes. Transfer to a serving plate, scoop the ice cream inside the cavities and drizzle with melted chocolate and toasted walnuts.

Enjoy!

Cantaloupe Sorbet


My family is not a cantaloupe lover, but my husband is. So, I bought one yesterday, then I asked myself how can we use the rest of this whole thing, and after browsing some recipes, I decided to make it into a sorbet. The result was incredible, my little guys asked for seconds, and I cannot lie, that cantaloupe sorbet was pretty darn good!

So, if you want to give this recipe a try, just get your ingredients and utensils ready... it's pretty easy!!


Ingredients:

3/4 cup granulated sugar
3/4 cup water
1 fresh mint sprig (about 3 to 4 medium leaves)
1 cantaloupe, diced (about 2 1/2 lb.)
1/3 cup fresh squeezed orange juice
1/3 cup fresh squeezed lemon juice
1 Tbspn. corn syrup


Directions:

Place sugar, mint leaves and water in a 1 1/2 quart saucepan. Bring to a boil over medium high heat, reduce heat to medium and cook until the sugar is completely dissolved to make a simple syrup - you will have about 1 1/4 cups of simple syrup. You can fill it up with water to get this amount if you ended up having less. Transfer to a bowl and let it cool completely.

Place the melon cubes in a food processor fitted with the metal blade. Pulse to chop, then process until completely pureed -it should yield about 6 cups. Stir in the orange and lemon juice, corn syrup and the simple syrup (without the mint sprig). Process until well combined. Transfer to a bowl and chill for 2 hours or longer.

Pour the mix into an ice cream maker, and let it mix until thickened, about 20 to 25 minutes. The sorbet will have a soft slushy texture, similar to a freshly scooped Italian ice. If you want a firmer consistency, just transfer it to an airtight container and place it in the freezer for about 2 hours. Remove from the freezer about 15 minutes before serving.

Enjoy!


Source: Adapted from Cuisinart Recipe Booklet

Monday, July 12, 2010

Mini Cupcakes


I've been baking a lot of cupcakes lately, so I decided to share this wonderful and versatile recipe with all of you. Sometimes you just need to keep it simple, to make it look and taste wonderful. This is a very easy and quick recipe. Just add some here and there and you can end up with amazing creations from it.


Ingredients:

- For the Cupcakes:

2 1/4 cups cake flour
1 tablespoon baking powder
1/2 teaspoon salt
1 1/4 cups whole milk or buttermilk
4 large egg whites
1 1/2 cups sugar
2 teaspoons grated lemon zest
1 stick (8 tablespoons) unsalted butter, at room temperature
1/2 teaspoon pure lemon extract (I substituted for vanilla extract)


- For the Easy Vanilla Buttercream:

2 1/2 sticks unsalted butter, softened
2 1/2 cups confectioners' sugar, sifted
1/8 tspn. salt
2 tspn. vanilla extract
2 Tbspn. heavy cream


Directions:

Preheat your oven to 350 degrees F. Line your mini muffin pans with the mini cupcakes liners (The recipe makes about 60).

Sift together the flour, baking powder and salt.

Whisk together the milk and egg whites in a medium bowl.

Put the sugar and lemon zest in a mixer bowl or another large bowl and rub them together with your fingers until the sugar is moist and fragrant. Add the butter and, working with the paddle or whisk attachment, or with a hand mixer, beat at medium speed for a full 3 minutes, until the butter and sugar are very light. Beat in the extract, then add one third of the flour mixture, still beating on medium speed. Beat in half of the milk-egg mixture, then beat in half of the remaining dry ingredients until incorporated. Add the rest of the milk and eggs, beating until the batter is homogeneous, then add the last of the dry ingredients. Finally, give the batter a good 2-minute beating to ensure that it is thoroughly mixed and well aerated. Pour the batter into the prepared pans.

Bake for 15 minutes, or until the cakes are well risen and springy to the tough. Transfer the cupcakes to cooling racks and cool for about 5 minutes, then unmold them and let them cool completely.

In the mean time, start preparing the Buttercream icing.

In a stand mixer fitted with the whisk attachment, beat butter at medium-high speed until smooth, about 20 seconds. Add confectioners’ sugar and salt; beat at medium-low speed until most of the sugar is moistened, about 45 seconds. Scrape down the bowl and beat at medium speed until mixture is fully combined, about 15 seconds. Scrape bowl, add vanilla and heavy cream, and beat at medium speed until incorporated, about 10 seconds. Then increase the speed to medium-high and beat until light and fluffy, about 4 minutes, scraping down bowl once or twice.


Source: Adapted from "Baking From My home to yours" by Dorie Greenspan (cupcakes)
"Annie's Eats" - Easy Vanilla Buttercream

Gift


I got this cute witch from my friend Angelica. Thanks so much!!! It took me forever to be back, sorry everybody!!!!!

Here are some blogs that I recommend you guys to go visit:

- Cocina Chilena by Angelica
- La Brujita de Jenjibre by La Brujita
- Cocina de Mercado by Sol
- Cool e Chic Style, confidential by Stefania
- Dulcinea by Claudia
- En mi cocina hoy by Pilar
- Recetas y Condimentos by Annie
- La cocina de Blo by Blo

Amazing recipes (chilean and worldwide flavors)

Tuesday, June 29, 2010

Roasted Shrimp & Orzo Salad


This is a perfect dish to make in advance. The flavors get more incorporated and blended when you do it the day before. It is fresh. It's a guilty free pleasure and very easy to make, what else can you ask for?

Really, it is a very summery and easy dish. You should give it a try if you are a shrimp lover. If you don't do seafood, you can totally replace the shrimp by roasted chicken :)


Ingredients:

Kosher salt
Good olive oil
3/4 pound orzo pasta (rice-shaped pasta)
1/2 cup freshly squeezed lemon juice (3 lemons)
Freshly ground black pepper
2 pounds (16 to 18 count) shrimp, peeled and deveined
1 cup minced scallions, white and green parts
1/2 cup chopped fresh dill
1/2 cup chopped fresh mint leaves
1 cup chopped fresh flat-leaf parsley
1 hothouse cucumber, unpeeled, seeded, and medium-diced
1/2 cup small-diced red onion
3/4 pound good feta cheese, large diced


Directions:

Preheat the oven to 400 degrees F.

Fill a large pot with water, add 1 tablespoon of salt and a splash of oil, and bring the water to a boil. Add the orzo and simmer for 9 to 11 minutes, stirring occasionally, until it's cooked al dente. Drain and pour into a large bowl.

Whisk together the lemon juice, 1/2 cup olive oil, 2 teaspoons salt and 1 teaspoon of pepper. Pour over the hot pasta and stir well.

Meanwhile, place the shrimp on a sheet pan, drizzle with olive oil, and sprinkle with salt and pepper. Toss to combine and spread out in a single layer. Roast for 5 to 6 minutes, until the shrimp are cooked through. Don't overcook!

Add the shrimp to the orzo and then add the scallions, dill, parsley, mint, cucumber, onion, 2 teaspoons salt, and 1 teaspoon pepper. Toss well. Add the feta and stir carefully. Set aside at room temperature for 1 hour to allow the flavors to blend, or refrigerate overnight.

If refrigerated, taste again for seasonings and bring back to room temperature before serving.


Source: Recipe Courtesy of Food Network - Barefoot Contessa at Home (Adapted)

Wednesday, June 23, 2010

Whole Wheat Sandwich Bread


This bread has won a place in our kitchen. It is very easy to make and very flavorful. It is not the regular whole wheat that you would buy at a store. It is heavier, but better. I promise.


Ingredients:

1 cup warm whole milk (110 degrees)
1/3 cup warm water (110 degrees)
3 Tbsp. unsalted butter, melted and cooled, plus extra for brushing.
3 Tbsp. honey
1/4 cup toasted wheat germ
2 cups bread flour + 1/4 cup extra if needed
1 1/2 cups whole wheat flour
1 envelope instant or rapid-rise yeast (2 1/4 tsp.)
2 tsp. salt


Directions:

1. Whisk the milk, water, butter, and honey together in a large liquid measuring cup.

2. Toast the wheat germ in a dry skillet until fragrant, about 5 minutes,

3. In the bowl of your electric mixer, fitted with the dough hook, combine the flours (bread and whole wheat), toasted wheat germ, yeast and salt. With the mixer on low speed, add the milk mixture and mix until the dough comes together, about 2 minutes.

4. Increase the mixer speed to medium-low and knead until the dough is smooth and elastic, about 8 minutes. If after 4 minutes more flour is needed, add the remaining 1/2 cup flour, 2 tablespoons at a time, until the dough clears the sides of the bowl but sticks to the bottom.

5. Turn the dough out onto a lightly floured counter and knead by hand to form a smooth round ball. Place the dough in a large, lightly oiled bowl and cover with greased plastic wrap. Let rise in a warm place until doubled in size, 1 to 1 1/2 hours.

6. Grease a 9 by 5-inch loaf pan. Turn the dough out onto a lightly floured counter and, gently press into a 9-inch square. Roll the dough into a tight cylinder and pinch the seam closed. Place the loaf seam side down, in the prepared pan. Mist the loaf with vegetable oil spray, cover loosely with plastic wrap, and let rise in a warm place until nearly doubled in size and the dough barely springs back when poked with a knuckle, 45 to 75 minutes).

7. Adjust an over rack to the lower-middle position and heat the oven to 350 degrees. Brush the loaf lightly with melted butter, then spray lightly with water. Bake until golden and the center of the bread registers 200 degrees on an instant-read thermometer, 40 to 50 minutes, rotating the loaf halfway through baking. Cool the loaf in the pan for 15 minutes, then flip out onto a wire rack and let cool to room temperature, about 2 hours before serving.


TO MAKE AHEAD:

In step 5, do not let the dough rise, but refrigerate it overnight or up to 16 hours; let the dough sit at room temperature for 30 minutes, then continue with step 6.


Source: "The America's Test Kitchen Family Baking Book"

Tuesday, June 22, 2010

Awards

A couple days ago I was pleasantly surprised by a cyber/chilean friend. I got these two beautiful gifts from her. She has a wonderful blog (in Spanish), please go visit it, I highly recommend it! So many dishes that remind my childhood and life in my beloved Chile! Thank you, so much Angelica!!! You can visit her blog just clicking in here.

Now, the big challenge! Who do I give these beautiful awards? Lots of you out there read our blogs and get inspired with new flavors, new recipes, new stories, etc. I also want to thank you, my blogger buddies for the effort you put in every post. Sharing your talent with the cyber world!


So, here we go:

- Stefania. I've became her follower a few weeks ago. Even though her blog is in Italian, there is so much to learn!!! (Awesome, awesome pictures too!)

- Pilar. A chilean/cyber friend that I met through the blog and got to meet several of you! She has beautiful and delicious recipes. Her breads are amazing!

- Sol. Her recipes are so delicious and they always look so fresh!

- Annie. She is my hero! I follow her blog for a little bit more than a year. Her recipes are so good!!! Easy to make and look so fancy! She is amazing!


Thanks again, Angelica!!!! Te pasaste!!

Wednesday, June 16, 2010

Mac and Cheese, with the volume turned up!


I love Ina Garten's recipes, and this one especially didn't disappoint me. It was so creamy, with a nice crusty top and freshness provided by the tomatoes. The nuttiness added by the Gruyere cheese was amazing... you should try this one!

Ingredients:

Kosher salt
Vegetable oil
1 pound elbow macaroni or cavatappi
1 quart milk
8 tablespoons (1 stick) unsalted butter, divided
1/2 cup all-purpose flour
12 ounces Gruyere, grated (4 cups)
8 ounces extra-sharp Cheddar, grated (2 cups)
1/2 teaspoon freshly ground black pepper
1/2 teaspoon ground nutmeg
3/4 pound fresh tomatoes (4 small)
1 1/2 cups fresh white bread crumbs (5 slices, crusts removed)


Directions:

Preheat the oven to 375 degrees F.

Drizzle oil into a large pot of boiling salted water. Add the macaroni and cook according to the directions on the package, 6 to 8 minutes. Drain well.

Meanwhile, heat the milk in a small saucepan, but don't boil it. Melt 6 tablespoons of butter in a large (4-quart) pot and add the flour. Cook over low heat for 2 minutes, stirring with a whisk. While whisking, add the hot milk and cook for a minute or two more, until thickened and smooth. Off the heat, add the Gruyere, Cheddar, 1 tablespoon salt, pepper, and nutmeg. Add the cooked macaroni and stir well. Pour into a 3-quart baking dish.

Slice the tomatoes and arrange on top. Melt the remaining 2 tablespoons of butter, combine them with the fresh bread crumbs, and sprinkle on the top. Bake for 30 to 35 minutes, or until the sauce is bubbly and the macaroni is browned on the top.


Source: Food Network - Recipe Courtesy of Ina Garten - Barefoot Contessa Family Style.

Monday, June 7, 2010

Tuscan Lemon Chicken


I've made this recipe many times, but always I made it in the oven instead of grill. This past weekend I decided to grill it, and it was the best decision ever!!! It was so delicious, full of flavor and with that smoky flavor that only you can get when you grill. If you happen to have a gas grill, like me, you'll have to adjust the cooking timing. (It grills more slowly than charcoal)


Ingredients:

1 (3 1/2-pound) chicken, flattened
Kosher salt
1/3 cup good olive oil
2 teaspoons grated lemon zest (2 lemons)
1/3 cup freshly squeezed lemon juice
1 tablespoon minced garlic (3 cloves)
1 tablespoon minced fresh rosemary leaves
Freshly ground black pepper
1 lemon, halved


Directions:

Sprinkle the chicken with 1 teaspoon salt on each side. Combine the olive oil, lemon zest, lemon juice, garlic, rosemary, and 2 teaspoons pepper in a small measuring cup. Place the chicken in a ceramic or glass dish just large enough to hold it flat. Pour the lemon marinade over the chicken, turning it in the dish. Cover the dish with plastic wrap and refrigerate for at least 4 hours or overnight. Turn the chicken 2 or 3 times while marinating.

When ready to grill, prepare a hot charcoal fire on 1 side of a grill (or turn a gas grill on low heat). Spread 1/4 of the coals across the other side of the grill. Place the chicken on the cooler side, skin side up, and weigh it down with the dish you used for marinating. Cook for 12 to 15 minutes, until the underside is golden brown. Turn the chicken skin side down, weight again with the dish, and cook for another 12 to 15 minutes, until the skin is golden brown and the chicken is cooked through. Place the lemon halves on the cool side of the grill, cut side down for the last 10 minutes of cooking. Remove the chicken to a plate or cutting board, cover with aluminum foil, and allow to rest for 5 minutes. Cut in quarters, sprinkle with salt, and serve with the grilled lemon halves.

Enjoy!


Source: Recipe Courtesy of Ina Garten - "Back to basics"

Thursday, June 3, 2010

Oven Roasted Garlic Gourmet Potatoes


This is a perfect side dish for any kind of protein. Full of flavor and delicious texture. If you are a fun of garlic, this is the recipe you need to try!

Ingredients:

1 1/2 pounds fingerling/gourmet potatoes
4 tablespoons olive oil
8 garlic cloves, minced
1 tablespoon freshly chopped Italian parsley leaves
Salt and freshly ground black pepper


Directions:

Preheat the oven to 400 degrees F.

In a casserole dish, put the potatoes in a single layer. Season with salt and pepper. Sprinkle the garlic cloves and drizzle with the olive oil. Roast for 20 minutes, toss them and keep baking for another extra 15 minutes or until the potatoes are tender. Add the parsley leaves right before serving.


Enjoy!

Wednesday, June 2, 2010

Stuffed Salmon, anyone?


I made this roasted stuffed salmon last night. It was a complete success! Full of flavor, juicy and succulent, perfectly baked and easy to make. Doesn't that sound like your kind of dish? If so, here is the recipe. Enjoy!


Ingredients:

1 (10 pound) fresh salmon
5 cups sliced yellow onions, 1/4-inch thick (3 pounds)
5 cups sliced fennel bulbs, 1/4-inch thick (3 pounds)
1/2 cup good olive oil
3 tablespoons fresh thyme leaves, coarsely chopped
2 tablespoons coarsely chopped fennel fronds
1 orange, zested
2 tablespoons freshly squeezed orange juice
2 teaspoons kosher salt
1 teaspoon freshly ground black pepper


Directions:

Have the fishmonger cut the head and tail off the salmon and butterfly it, removing all the bones. You should have about 7 pounds of salmon.

Preheat the oven to 500 degrees F.

Saute the onions and fennel in the olive oil for 10 minutes on medium-high heat, stirring occasionally. Add the thyme leaves, fennel fronds, orange zest, orange juice, salt, and pepper and saute for 5 more minutes, until the onions and fennel are tender. Taste for salt and pepper.

Lay the salmon, skin side down, on a cutting board and sprinkle both sides generously with salt and pepper. Spread the fennel filling over half of the salmon. Pull the other half up and over the filling, enclosing it. Tie the salmon every 2 inches with kitchen string to secure the stuffing.

Place a sheet pan lined with parchment paper in the oven for 5 minutes to heat it. Carefully transfer the salmon to the hot sheet pan and bake it for exactly 30 minutes (10 minutes for each 1-inch of thickness). Do not overbake!

Allow to cool slightly, then remove the strings. To serve, cut into thick slices with a very sharp knife. This salmon is delicious hot or at room temperature.

Note: If you're making this in advance, be sure to cool the filling before stuffing the salmon. Refrigerate until ready to roast.


Source: Food Network - Recipe Courtesy of Ina Garten "Barefoot Contessa Cookbook - 1999"

Sunday, May 30, 2010

Cheddar Bacon Scones


You are not reading wrong. These are cheddar - bacons scones. They are delicious!! Seriously. The best savory scones I've ever made. They are dangerous!!! but these are not my own creation. I saw this recipe at Annie's Eats and I just had to make them. So, she deserves all the credit for such and amazing treat!


Ingredients:

3 cups all-purpose flour
1 tbsp. baking powder
1 tsp. salt
1-2 tsp. ground black pepper (depending on your preference)
8 tbsp. cold unsalted butter, cut into small cubes
1½ cups grated cheddar cheese
4 green onions, thinly slices
10 slices bacon, cooked and chopped or crumbled into small pieces
1 cup buttermilk (plus up to ½ cup extra, if needed)
1 large egg
2 tbsp. water


Directions:

Preheat the oven to 400˚ F. In the bowl of an electric mixer fitted with the paddle attachment, combine the flour, baking powder, salt and black pepper; mix briefly to combine. Add the cubes of butter and mix on low speed until the mixture is crumbly and the butter pieces are about the size of small peas. (Alternatively, this can be done in a regular mixing bowl, using a pastry blender or two knives to cut the butter into the dry ingredients.) Add in the grated cheese and mix just until incorporated.

Mix in the green onions, bacon, and 1 cup of the buttermilk into the flour-butter mixture. Stir by hand just until all the ingredients are incorporated. If the dough is too dry to come together, mix in the remaining buttermilk a tablespoon or two at a time until the dough can be formed into a ball. Transfer the dough to a lightly floured surface and pat the dough into an 8-inch disk. Slice the dough into 8 to 10 wedges.

In a small bowl combine the egg and water and whisk together. Brush each wedge lightly with the egg wash. Transfer the scones to an ungreased baking sheet. Bake for 18-20 minutes, or until golden brown and a toothpick inserted in the center comes out clean.

Enjoy!

Source: Recipe Courtesy of "Annie's Eats"

Thursday, May 27, 2010

It's been three months...

Dear friends,

Today I am not going to post a recipe, I'll just upload a video that a friend shared with me a few days ago... It's been three months since Chile was hit by a terrible earthquake. Still there is a lot of need, a lot of pain, a lot to be healed of. Please keep my country in your prayers, especially today.

Wednesday, May 26, 2010

Homemade Granola Bars


These are the perfect snack! Full of flavor and rich consistency. Give them a try, you won't regret it!


Ingredients:

2 cups old-fashioned oatmeal
1 cup sliced almonds
1 cup shredded coconut, loosely packed
1/2 cup toasted wheat germ
3 tablespoons unsalted butter
2/3 cup honey
1/4 cup light brown sugar, lightly packed
1 1/2 teaspoons pure vanilla extract
1/4 teaspoon kosher salt
1/2 cup chopped pitted dates
1/2 cup chopped dried apricots
1/2 cup dried cranberries


Directions:

Preheat the oven to 350 degrees F. Butter an 8 by 12-inch baking dish and line it with parchment paper.

Toss the oatmeal, almonds, and coconut together on a sheet pan and bake for 10 to 12 minutes, stirring occasionally, until lightly browned. Transfer the mixture to a large mixing bowl and stir in the wheat germ.

Reduce the oven temperature to 300 degrees F.

Place the butter, honey, brown sugar, vanilla, and salt in a small saucepan and bring to a boil over medium heat. Cook and stir for a minute, then pour over the toasted oatmeal mixture. Add the dates, apricots, and cranberries and stir well.

Pour the mixture into the prepared pan. Wet your fingers and lightly press the mixture evenly into the pan. Bake for 25 to 30 minutes, until light golden brown. Cool for at least 2 to 3 hours before cutting into squares. Serve at room temperature.


Source: Ina Garten - "Back to Basics"

Monday, May 24, 2010

Spring Green Risotto


I've never made Risotto before, and I was looking forward to it. This past weekend my husband wanted to try something different but sort of healthier, so I decided to try this recipe. It was a complete success! It has a velvety texture and full of fresh earthy flavors. This recipe is very comforting, so with one portion you'll have more than enough.


Ingredients:


1 1/2 tablespoons good olive oil
1 1/2 tablespoons unsalted butter
3 cups chopped leeks, white and light green parts (2 leeks)
1 cup chopped fennel
1 1/2 cups Arborio rice
2/3 cup dry white wine
4 to 5 cups simmering chicken stock, preferably homemade
1 pound thin asparagus
10 ounces frozen peas, defrosted, or 1 1/2 cups shelled fresh peas
1 tablespoon freshly grated lemon zest (2 lemons)
Kosher salt and freshly ground black pepper
2 tablespoons freshly squeezed lemon juice
1/3 cup mascarpone cheese, preferably Italian
1/2 cup freshly grated Parmesan, plus extra for serving
3 tablespoons minced fresh chives, plus extra for serving


Directions:

Heat the olive oil and butter in a medium saucepan over medium heat. Add the leeks and fennel and saute for 5 to 7 minutes, until tender. Add the rice and stir for a minute to coat with the vegetables, oil, and butter. Add the white wine and simmer over low heat, stirring constantly, until most of the wine has been absorbed. Add the chicken stock, 2 ladles at a time, stirring almost constantly and waiting for the stock to be absorbed before adding more. This process should take 25 to 30 minutes.

Meanwhile, cut the asparagus diagonally in 1 1/2-inch lengths and discard the tough ends. Blanch in boiling salted water for 4 to 5 minutes, until al dente. Drain and cool immediately in ice water. (If using fresh peas, blanch them in boiling water for a few minutes until the starchiness is gone.)

When the risotto has been cooking for 15 minutes, drain the asparagus and add it to the risotto with the peas, lemon zest, 2 teaspoons salt, and 1 teaspoon pepper. Continue cooking and adding stock, stirring almost constantly, until the rice is tender but still firm.

Whisk the lemon juice and mascarpone together in a small bowl. When the risotto is done, turn off the heat and stir in the mascarpone mixture plus the Parmesan cheese and chives. Set aside, off the heat, for a few minutes, sprinkle with salt and pepper, and serve hot with a sprinkling of chives and more Parmesan cheese.


Source: Ina Garten - "Back to Basics".

Thursday, May 20, 2010

Flaky biscuits


Nothing like a flaky warm biscuit for a hearty breakfast or simply to have a cup of coffee with some biscuits and jelly... delicious! I saw this recipe online, and decided to try it. I wasn't disappointed!


Ingredients:

2 c. all purpose flour
2 1/2 tsp baking powder
1/2 tsp salt
6 Tbsp cold unsalted butter
2 Tbsp. melted butter
3/4 c. milk

Directions:

Preheat oven to 450 degrees.

In large bowl, sift or whisk together flour, powder and salt. Cut the butter, very cold, into dry ingredients until butter pieces are about the size of a pea. Add the milk and mix until just combined (texture should be sticky, moist and lumpy).

Roll the dough out on surface prepared with powdered sugar (rather than flour) into an aproximate 1 inch thickness (the more generous you are with the thickness, the bigger your biscuits will be).

Cut with lightly floured biscuit cutter and place on prepared baking sheet.

Brush each biscuit with the melted butter.

Place in oven and bake for about 10-12 minutes or longer until tops are nicely browned.

Serve immediately.


Source: "Joy of Cooking"