Monday, September 13, 2010

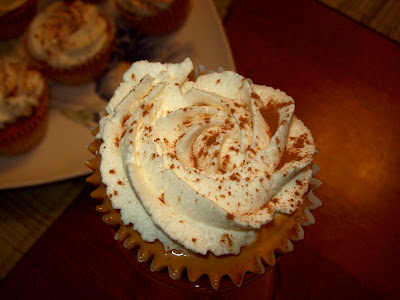
Tres Leches Cupcakes


This is a delicious and simply recipe to wow your crowds!


Ingredients:

6 large eggs, separated, room temperature
1/4 teaspoon baking soda
1/4 teaspoon coarse salt
1 cup sugar
1/2 cup (1 stick) unsalted butter, melted and cooled
1 cup all-purpose flour, sifted
1 can (12 ounces) evaporated milk
1 can (14 ounces) sweetened condensed milk (1 1/2 cups)
3/4 cup heavy cream
2 cups heavy cream
1/4 cup confectioner's sugar sifted
Ground cinnamon, for dusting


Directions:

1. Preheat oven to 325ºF. Line standard muffin tins with paper-lined foil liners. With an electric mixer on medium speed, whisk together egg whites, baking soda, and salt until soft peaks form. Reduce speed to low. Add yolks and sugar; whisk until completely combined. Fold in melted butter with a flexible spatula. Add flour in four batches, folding until just combined after each.

2. Divide batter evenly among lined cups, filling each halfway. Bake, rotating tins halfway through, until light golden brown, about 25 minutes. Remove from oven. Immediately poke holes in tops of cupcakes with a skewer.

3. Whisk together evaporated milk, condensed milk, and heavy cream. With cupcakes still in tins, brush milk mixture over cupcakes, repeating until all liquid has been used. Allow cupcakes to absorb mixture, at least 30 minutes (or up to 1 day in the refrigerator, wrapped tightly in plastic once completely cool; bring to room temperature before serving).

4. Whisk heavy cream until soft peaks form. Add confectioner's sugar, and whisk until combined. If not using immediately, whipped cream can be refrigerated, covered tightly, up to 3 hours in an airtight container.

5. To finish, dollop whipped cream generously onto cupcakes, and dust with ground cinnamon. Serve immediately.


Source: Martha Stewart's Cupcakes

Wednesday, September 1, 2010

How to freeze corn

This summer I've been very interested in freezer fresh organic fruits and vegetables for our winter use. After checking several websites, I decided that this approach gets the best flavor of our produces after they are frozen. If you want to freeze some corn, here are some tips that may help you to do it!


Ingredients and Equipment Needed:

6 fresh corn on the cob
1 Large pot of boiling water
1 Large pot of iced water
Vacuum food sealer, 1 quart plastic containers for frozen food or "Ziploc" type freezer bags
1 sharp knife
1 set of tongs

Directions:

1. Husk the corn and pick off as much of the silk as you can. A soft vegetable brush is the fastest and easiest way to get the remaining silk off - just don't be too rough with it.

2. Get the pot filled ¾ full with hot water, put it on your largest burner (or straddle two burners) and get it heating to a full rolling boil. Next, get the other pot or big bowl filled with ice and cold water. You may need to buy a bag or two of ice if you are planning to do more than a dozen ears of corn.

3. Begin counting the blanching time as soon as you place the corn in the boiling water. Cover the kettle and boil at a high temperature for 4 minutes. You may use the same blanching water several times (up to 5). Be sure to add more hot water from the tap from time to time to keep the water level at the required height.

Blanching time varies depending on the type of frozen corn you are making: cut-whole kernel,cream style or corn-on-the-cob: between 4 to 6 minutes.


4. After vegetables are blanched, cool them quickly to prevent overcooking. Plunge the corn into a large quantity of ice-cold water (I keep adding more ice to it). A good rule of thumb: Cool for the same amount of time as the blanch step. For
instance, if you blanch sweet corn for 4 minutes, then cool in ice water for 4 minutes.


5. Cut kernels from cob about 2/3 the depth of the kernels. I hold the ear by the
small end, and slide the knife down the ear.


6. Bag the corn. You can use a vacuum food sealer to prevent freeze burn. Otherwise, make sure you get all the air out of your bags or plastic containers. Label your packages and freeze immediately.